Showing posts with label SCA. Show all posts

Tuesday, July 10, 2018

Making Ink after the ferment

OK. Lots of photos today! I finished making ink after waiting 10 days for my oak galls to soak & ferment.
After 10 days of soaking/fermenting. 
You can see the dark color - more like coffee after 10 days. You can also see the layer of mold & bits  on the side & bottom of the pickle jar.

 This is sitting on the floor right next to my stove.
Drips can make permanent stains! I'm wearing old clothes. I set up this pickle jar with paper towels on the floor next to my stove to hold my spoon while I'm stirring and straining.

All the empty jars waiting to be filled!
I also put all the waiting empty ink jars on a layer of paper towels atop a plank of scrap wood to protect my kitchen counter. There will be spills.

Pouring the liquid through a strainer will take out all the larger chunks of oak gall & remove the surface layer of mold. I did not line the strainer with anything while pouring through the first time.


 I'm taking Ian the Green's advice & straining the mix through linen cloth rather than coffee filters for the second straining.

I have to agree with Ian. Straining through linen is much faster than through a coffee filter. 
You can see all the little particles caught by the linen. the resulting liquid is pretty clear.

The original recipe says to 'pour boiling water over the mixture to kill the ferment.' I'm going to bring the strained oak gall juice to a boil to make sure that I kill whatever mold may be growing in the mixture. I'll turn off the heat once it reaches a boil.

You can see the steam & bubbles.
I let it cool for a bit before adding the iron sulfate, although it was still pretty warm.

Bingo! Lovely black shade after adding iron sulfate.
Now to add the gum Arabic. I've dissolved it in a cup of tap water.


The extra cup of water really won't hurt anything since some of the previous liquid evaporated over the 10 day ferment. A bit of liquid was also lost during the straining process. More water evaporated while I brought the ink to a boil. Adding a cup of liquid with gum Arabic brings the total quantity back to about 4 cups. Stir well!

This is an easy and disposable pouring tool.
I used several paper cups to pour the ink into the bottles. The still warm ink can tend to soak through a bit.


My usual mess. Great black color though!
Keep your trash can nearby too! Everything drips & the less distance to the trash for used cups & paper towels, the better! Wipe down all the bottles after they are filled.


Hmm, maybe some rubber gloves for next time too!


Friday, June 22, 2018

 Ink-Making Equipment
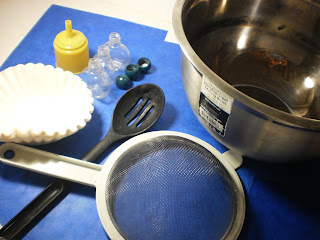
 
Some of the basics.
First - DON'T cross the streams! This is a good safety tip. Keep your ink-making equipment separate from your cooking equipment. They may look the same, but get some cheap gear & keep it just for making ink. You don't want to prepare food with any of this stuff after it's been in ink. That bowl in the upper right? It has a permanent black/brown stain which would absolutely contaminate your food.

That said, cheap is good! If you can't find a sauce pan or large metal bowl at the dollar store, use a large soup can or a #10 can of pudding (emptied & cleaned, mmm pudding). Not all ink recipes call for heating the ink, but a metal container can go on the stove if necessary. Hmm, hot pads would also be good. You will probably need two large-ish containers. One for the un-strained ink and one to strain the filtered ink into. It's a real nuisance to try to strain anything while you're pouring it into tiny ink bottles. You'll also need some kind of spoon to stir things, a strainer to remove the big lumps, coffee filters to remove the little lumps, tiny little bottles to store your finished ink (with water-tight caps), a funnel to get the ink into the tiny little bottles, and probably a hammer (not shown.) The hammer is for smashing up the oak galls. By the way, you can get tiny funnels like this one in the sporting goods section. They're used to fill camp stoves that use white gas instead of propane tanks. Again, don't use the funnel for anything besides ink - not sure what it would do to your camp stove to get ink in your fuel.
****
A good tip from Hroswitha von Lippe, "Remember spills can be permanent." (Good idea to cover surfaces with plenty of newspaper or paper towels just in case!)
Another from Ian the Green, "I recommend linen for filtering. It goes much faster. I also believe it does a better job in my opinion than the coffee filters." (Coffee filters do take a long time. I'll see if I have any linen to use this time around.)
****

I hope you had a chance to follow links from my last blog & read through some of the recipes. I will probably be using one of the simpler recipes this time. One that doesn't involve cooking the ink, additional ingredients, or letting the galls sit long enough to ferment.

***

I've posted another link to a book absolutely bursting with ink information. You'll have to contact them by email or phone (listed on the web site) rather than purchasing online, but it's well worth it at $8.95. "Manuscript Inks" by Jack C. Thompson, available from Caber Press:
http://home.teleport.com/~tcl/mi.htm

Thursday, June 21, 2018

You will also need 
WATER 
to make your ink.

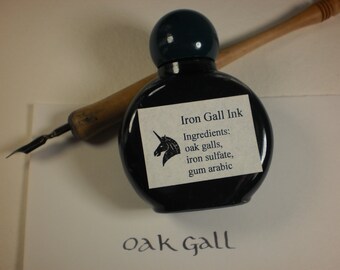
Ink from the last batch I made.
If your ink turns out a funny color, or does something else weird, you might have contaminants in your water. My hometown sends out a water quality report once a year, so I pretty much know there's not much in there that will affect my ink. If you've got well water, or just aren't sure what's in your local water, maybe use distilled or bottled water. I've also seen some ink recipes that call for wine or some other liquid. I haven't tried any of those yet, so I'm sticking with tap water this time.

Here's a little online booklet from Yale University containing medieval ink recipes:
https://travelingscriptorium.files.wordpress.com/2014/06/scopa-recipes-booklet_web-june-2014.pdf

There is a lot of information about making ink and some recipes here:
https://irongallink.org/igi_indexc33a.html

Ian the Green has been making ink for quite some time. Here's a link to his blog:
https://scribescribbling.wordpress.com/

More info about medieval ink at Stefan's Florilegium Archive:
http://www.florilegium.org/

There are tons of ink recipes online, and even more in actual treatises from the middle ages. If you find any good recipes that have worked for you, please share!

Monday, June 18, 2018

I'm down to 2 last bottles of handmade iron gall ink. 
Time to make a new batch of ink! 

If you kids want to follow along, https://irongallink.org/ has TONS of information on ink & recipes.
Ian's blog also has lots of info along with his personal experiences in ink-making:
https://scribescribbling.wordpress.com/

Not sure which recipe I want to try yet, but I'm collecting the materials needed. The first ingredient is
Oak Galls

An oak gall is a growth on an oak tree caused by insect damage. Tannic acid is concentrated in these galls and is the first basic ingredient in this type of ink. 

Aleppo oaks (Quercus infectoria) are supposed to produce the best ink - having a larger amount of tannic acid in the galls than other oaks. Galls from this species of oak are caused by wasps laying eggs in the tree. The resulting galls have been used in ink-making for centuries. 

Image result for Quercus infectoria
Aleppo oak tree - native to Greece & can be found in parts of southern Europe.
If you look closely at oaks in your area, you may also see lumps or round growths caused by similar insect damage. Several years ago, I made a small batch of ink from oak galls collected in Missouri. It was a good solid black ink, so feel free to experiment. (You may want to check with the owner of the oak tree(s) before you harvest galls. Might be a little embarrassing to be charged with trespass or property damage in your quest for ink.) I have no idea how to measure the amount of tannic acid in a given batch of oak galls. You might have to adjust your recipe if you're using galls from another species of oak.

SOURCES FOR OAK GALLS
Kremer Pigment sells aleppo oak galls: http://shop.kremerpigments.com/en/
Ancient Earth Pigments also sells them: https://www.ancientearthpigments.com/product/aleppo-gallnuts/

Yay! Oak galls.

Friday, January 27, 2017

Embroidered Edging


Embroidered edging.
Doing some embroidery on a linen gown.
This is the sleeve edge. Heavy gold silk and fine sewing weight green silk. Straight stitch next to the edge then a band of stem stitch outlining a line of long-arm cross stitch. Obviously, I'm not county thread on the cross stitch like I should be. It's the firs time I've tried this particular stitch, so it looks uneven and messy. Probably will improve as I practice on the rest of the garment. (I could tear it out & try again, but too lazy.)


I originally pinned a piece of 1/8 inch ribbon to the edge of the sleeve to measure the width between the rows of stem stitch. Unpinned the ribbon & worked the long arm cross stitch between the stem stitching.


This is one of my tatting shuttles & a circular motif I've tatted in heavy gold silk. I tatted a bunch of them in the same size.

Here you can see how the tatting is appliqued in a row around the neckline. You can see the centers of the tatted motifs have not yet been stitched in place. More stem stitch circles in green and gold outlining the tatting,  

I'm outlining the area where I want to do couched & laid work. A single strand of green silk thread marks the area. I just eye-balled the triangular shapes. 


You can see the area filled in & outlined with more gold stem stitch. I've also added glass beads in the centers of the tatting..

Closer view. You can get a little better look at the couched & laid work. This patch is pretty much finished.